On days when you find you have some extra downtime in your practice, how do you keep your team members busy? Not having the bustle of patients in the office will give you time to focus on areas that may not get attention every day, such as cleaning up your Dentrix Enterprise database. There are also several learning resources your team can access to sharpen their skills with Dentrix Enterprise.
Click on the links below to jump to the details about these tasks your practice needs most.
*This post will be updated regularly, so check back often for new ideas.*
Learning Resources
Essentials Online Training
Whether you are new to Dentrix Enterprise or a seasoned user, the Dentrix Enterprise Essentials Courses are a great way to learn new skills or get a little brush up. With courses on charting, scheduling, financial, and managing patient information there is something for everyone in your practice to learn. Just log in to the Resource Center with your customer service account ID and ZIP code and an entire library of training content is just a few clicks away.
The Dentrix Enterprise Blog
One of the best resources we have available for you is right here in the Dentrix Enterprise Blog. We post weekly software tips and tricks on how to best use Dentrix Enterprise. In addition to helpful tips, you’ll find information about new product announcements and read industry-related articles from our Product Management team. To get the most from the blog, remember to subscribe and you’ll get an email notification each time there is a new post.
The Dentrix Enterprise Newsletter
Get the latest Dentrix Enterprise news, software tips, articles, and product releases by signing up for the eNewsletter delivered directly to your inbox.
For the Administrative Team
- Cleaning Up Duplicate Insurance Plans
- Purging Unused Insurance Plans
- Cleaning Up Duplicate Employers
- Purging Unused Employers
- Purging Appointments
- Inactivating Staff or Providers – New
For the Front Office Team
For the Billing & Insurance Team
- Finding Procedures that Haven’t Been Billed to Insurance
- Finding Claims that Haven’t Been Sent to Insurance
- Finding Outstanding Insurance Claims for Follow-Up – New
- Tracking the Status of Insurance Claims
- Updating Treatment Plan Fees
- Updating Fee Schedules – New
For the Clinical Team
- Creating Clinical Note Templates
- Inactivating Old and Unused Procedure Codes
- Cleaning Up Unused Clinical Note Templates and Categories
- Remove Outdated Patient Alerts
- Attaching or Deleting Unfiled Documents in the Document Center
- Updating Treatment Case Statuses
Cleaning Up Duplicate Insurance Plans
When two different people enter information for the same insurance plan, or when someone doesn’t verify whether a plan exists before entering it in the database, you wind up with duplicate insurance plans in Dentrix Enterprise.
When duplicate plans exist in Dentrix Enterprise, neither is being properly updated with payment table and coverage table data, so the plans will have inconsistent estimate information. One may have more accurate estimates or more detailed information than the other, but there’s no way for the office staff to track which plan is which. The solution is to purge the system of duplicate plans. To clean up duplicate insurance plans:
- Find duplicate insurance plans in your database. Run the Insurance Carrier List for all insurance plans. From the Office Manager, click DXOne Reports. Under Select Report Category, select Reference > Insurance Carrier List. Under the Standard List checkbox select Include Subscribers. Generate the Insurance Carrier List. Using the list, find the duplicate plans in your database. Be sure to look at different spellings for the same plan (like BCBS, Blue Cross, and Blue Cross Blue Shield).
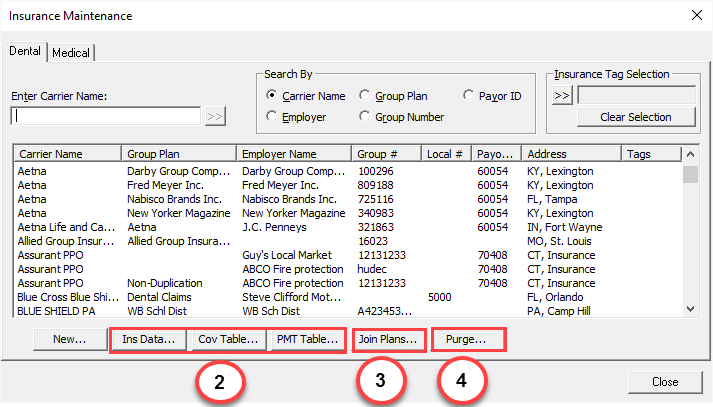
- Decide which of the duplicate plans you want to keep. You can use the Insurance Maintenance utility in the Office Manager to see information about each insurance plan in your database from one list. Click Maintenance > Reference > Insurance Maintenance to open the utility. Click Ins Data, Cov Table, or Pmt Table to get more information about each plan. Edit the name of the plan you want to keep with an asterisk (*) so you’ll be able to identify it easily.
- Join the duplicate plans together. Joining the plans moves all the subscribers from the plan you’re going to delete to the plan you want to keep. From the Office Manager, click Maintenance > Reference > Insurance Maintenance. Click Join Plans. Use the Plan-to-Plan option to join the plans. For the Source Insurance Plan, select the plan you want to delete. For the Destination Insurance Plan, select the plan you want to keep. Click Join.
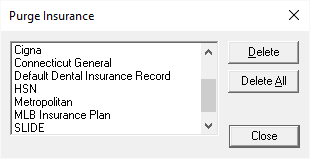
- Delete the duplicate plan. From the Office Manager, click Maintenance > Reference > Insurance Maintenance. Click Purge. Select the plan you want to delete, and click Delete. Note: You can’t delete a plan if there are outstanding claims attached to that plan, so you’ll have to wait for all claims to clear before you can finish this step.
Click Here for more information about deleting duplicate insurance plans.
Purging Unused Insurance Plans
When you stop accepting an insurance plan, it’s a good idea to get it out of your database so that someone doesn’t accidentally assign it to a patient. Dentrix Enterprise only allows you to delete insurance plans when they don’t have subscribers attached and when all claims for the plan have been received, so you may need to do a little work in order to get plans ready to be deleted. To purge (delete) an insurance plan:
- Run the Insurance Carrier List. From the Office Manager, click DXOne Reports. Under Select Report Category, select Reference > Insurance Carrier List. Use the list to find patients attached to the insurance plan and clear it from those patients.
- Run the Insurance Claim Aging Report. From the Office Manager, click DXOne Reports. Under Select Report Category, select Ledger > Insurance Claim Aging. View the claims that are open for that carrier. If the claims are old and will not be paid, close them. Otherwise, wait for payment to come in.
- Delete the plan. From the Office Manager, click Maintenance > Reference > Insurance Maintenance. Click Purge. Select the plan you want to delete, and click Delete.
Click Here to learn more about purging unused insurance plans.
Cleaning Up Duplicate Employers
It’s easy to end up with duplicate employers in Dentrix Enterprise. Often, two different people enter an employer for the same new patient or someone doesn’t verify whether an employer is already in Dentrix Enterprise before entering it in the database.
Having duplicate employers in your database increases the size of your database unnecessarily and can lead to other problems, like duplicate insurance providers. To clean up duplicate employers:
- Find the duplicate employers in your database. Run the Employers List to find duplicate employers in your database. From the Office Manager, click DXOne Reports. Under Select Report Category click Reference and double-click Employers and Employed Patients. Use the Employer List to find duplicate employers. Be sure to look at different spellings for the same employer (like Henry Schein, HS Inc, and HSIC).
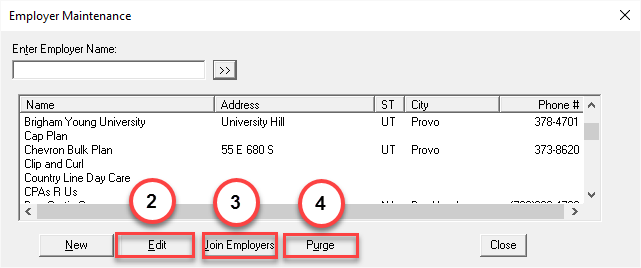
- Decide which of the duplicate employers you want to keep. You can use the Employer Maintenance utility in the Office Manager to see information about each employer in your database from one list. Click Maintenance > Reference > Employer Maintenance to open the utility. Click Edit to get more information about each employer. Edit the name of the employer you want to keep with an asterisk (*) so you’ll be able to identify it easily.
- Join the duplicate employers together. Joining the employers moves all the patients from the employer you’re going to delete to the employer you want to keep. From the Office Manager, click Maintenance > Reference > Employer Maintenance. Click Join Employers. For the Source Employer, select the employer you want to delete. For the Destination Employer, select the plan you want to keep. Click Join.
- Delete the duplicate employer. From the Office Manager, click Maintenance > Reference > Employer Maintenance. Click Purge. Select the employer you want to delete, and click Delete.
Click Here for more information about joining employers in Dentrix Enterprise.
Purging Unused Employers
Periodically, you should evaluate the list of employers in your database and purge any unused employers. That way the list of employers will be smaller and easier to manage when you create a new patient, and you won’t accidentally assign an incorrect employer to a new patient. To purge (delete) unused employers:
- Find patients attached to old employers. Patients (especially inactive or archived patients) may still be attached to employers you no longer need. From the Office Manager, click DXOne Reports. Under Select Report Category, click Reference and double-click Employers and Employed Patients. Check Include Employees on the report. Use the list to find patients attached to those employers and clear them from those patients.
- Delete the employers. From the Office Manager, click Maintenance > Reference > Employer Maintenance. Click Purge. Select the employers you want to delete, and click Delete.
Click Here to for more information about purging unused employers.

Purging Appointments
The Appointment Book stores data for appointments as far into the past as you have been using Dentrix Enterprise. After your practice has been using Dentrix Enterprise for several years, you can accumulate a large amount of data stored in the Appointment Book. You can purge the Appointment Book of data from several years ago to decrease the amount of data being stored in the Appointment Book and speed up your system. To purge appointments:
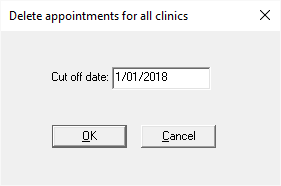
- To purge appointments for all clinics, log in to the Cenral clinic and open the Purge Appointments utility from the Office Manager. Click Maintenance > Reference > Purge Appointment. Or, to purge appointments for the clinic you are logged into, open the Purge Appointments utility from the Appointment Book. From the Appointment Book, click File > Purge Appointments.
- Determine the cutoff date you want to use to purge appointments. For example, if you want to continue to see appointments for the past two years in the Appointment Book, set the cutoff date for two years and one day in the past. Any appointments that were scheduled before the cutoff date will be deleted from the Appointment Book. Note: Dentrix Enterprise automatically adds an Office Journal entry for the patient that notes the date, time, and reason for the purged appointment so you still have record of it.
Click Here to learn more about purging appointments.
Inactivating Patients
Generally, if a patient hasn’t been in your office for several years and hasn’t responded to your efforts to get them back, you should set their status to inactive in the Family File.
Setting patients as Inactive prevents you from adding procedures or treatment plans, setting procedures or treatment plans complete, or viewing them in some reports. To inactivate a patient:
- Determine which patients need to be inactivated. What criteria will you use to determine if a patient should be inactivated? Meet with your team and determine how much time must past after a patient’s last appointment before the patient is considered inactive. Set up protocols for contacting patients to encourage them to come back to the office and determine which of those protocols need to be completed before a patient is inactivated.
- Decide which patients should be inactivated. Find patients in your database who should be inactivated. Generate the Patient/Inactive Patient List. From the Office Manager, click DXOne Reports. Under Select Report Category, select Lists and double-click Patient/Inactive Patient List. Search for patients with no future continuing care dates and no future appointments who have a last visit date before the length of time you determined in step 1.
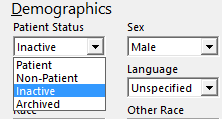
- Inactivate Patient Records. To inactivate a patient from your list in step 2, select the patient in the Family File, double-click the Patient Information block. Under Demographics, select Inactive for the Patient Status and click OK.
Click Here for more information about inactivating patients.
Inactivating Old and Unused Procedure Codes
Removing unused custom codes or expired ADA procedure codes from Dentrix Enterprise can greatly increase the efficiency of your practice. Providers can enter the procedures they use and not scroll through many that they do not. This also works for multi-codes and diagnostic codes. Doing this is not permanent. If a provider needs an inactive code, you can re-activate it at any time.
- Determine which procedure codes can be inactivated. We are suggesting two reports that can help with this. The first is the Procedure code list, which lists all of the codes currently available in Dentrix Enterprise. To run this report from the Office Manager click Reports > Reference > Procedure Code List. The second is the Production Summary, using the option to list by ADA code, listing the codes being used in the practice. To run this report, click DXOne Reports in the Office Manager. Under Select Report Category, select Analysis and double-click Production Summary. You will need to compare the two lists.
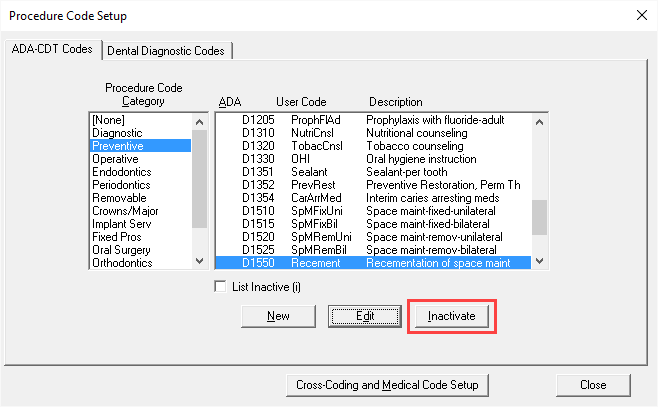
- Inactivate individual codes. From the Office Manager, click Maintenance > Practice Setup > Procedure Code Setup. Select the appropriate Procedure Code Category. Select the unused or expired code, and click Inactivate.
Note: Be careful not to inactivate codes that could be referred to other practices. These do not show on the Production Summary report.
Click Here for more information about inactivating unused or expired procedure codes.
Cleaning Up Continuing Care Types
In Dentrix Enterprise you can set up a completely customized continuing care system that fits the needs of your organization. You can set up multiple continuing care types for which you control the name, the interval, the provider, and the time required. And you can customize these types on a per-patient basis, which means you only need to set up one continuing care type for each kind of continuing care you want to track.
For example, you don’t need to set up a three-month perio type, a four-month perio type, and a six-month perio type. Instead, you should set up one perio type that can be customized as needed for each patient. If you have multiple types tracking the same kind of continuing care in your database, patients’ continuing care dates won’t reset at correct intervals and patients won’t show up on continuing care lists when they’re expected to. To clean up continuing care types:
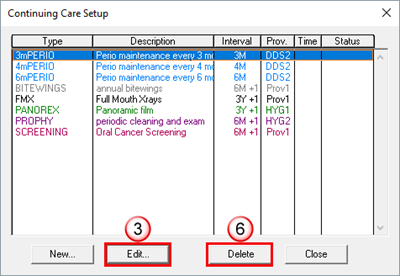
- Determine which continuing care types you want to track. From the Office Manager, click Maintenance > Practice Setup > Continuing Care > Continuing Care Setup. Evaluate each of the continuing care types listed there and determine whether you want to track them. Make note of the types you don’t want to track.
- Customize continuing care types to fit the most common interval. Select the types you want to track one by one and click Edit. Customize the type to reflect the most common interval you use in your office. Since you can edit each patient’s intervals on an individual basis, you don’t need to have separate types set up for each possible interval.
- Find any patients attached to the continuing care type(s) you don’t need. Generate a temporary view in the Continuing Care module to find patients attached to the continuing care type you don’t need. From the Appointment Book, click the Continuing Care button. In the Continuing Care module click Views > Temporary View. Select the continuing care type you don’t need and make sure With CC is selected.
- Re-assign patients to the correct continuing care type. Using the Continuing Care list you generated in step 3, clear the continuing care type you want to delete from each patient and assign them to the continuing care type you want to keep. Select each patient on the list and click Edit > Selected Patient’s Continuing Care. Click Edit and assign the patient to the continuing care type you edited in step 1. Next, select the continuing care type you want to delete and click Clear. Note: It is very important to reassign patients to the correct type before you delete the type you don’t want to use so patients don’t disappear from the list.
- Clear unwanted continuing care types from inactive patients and non-patients. When patients are inactivated or set as non-patients, their continuing care types are not cleared. You must also clear the continuing care types you want to delete from these patients. You can find the inactive patients and non-patients attached to a continuing care type using the Patient Report by Filters in the Letter Merge.
- Delete the continuing care types you don’t need. From the Office Manager, click Maintenance > Practice Setup > Continuing Care > Continuing Care Setup. Based on the types you decided to keep in step 1, select one of the types you want to delete, and click Delete. Repeat for all continuing care types you don’t need. Note: After you complete this step, you should only have one of each type of continuing care remaining in the list.
Click Here for more information about continuing care in Dentrix Enterprise.
Finding Procedures that Haven’t Been Billed to Insurance
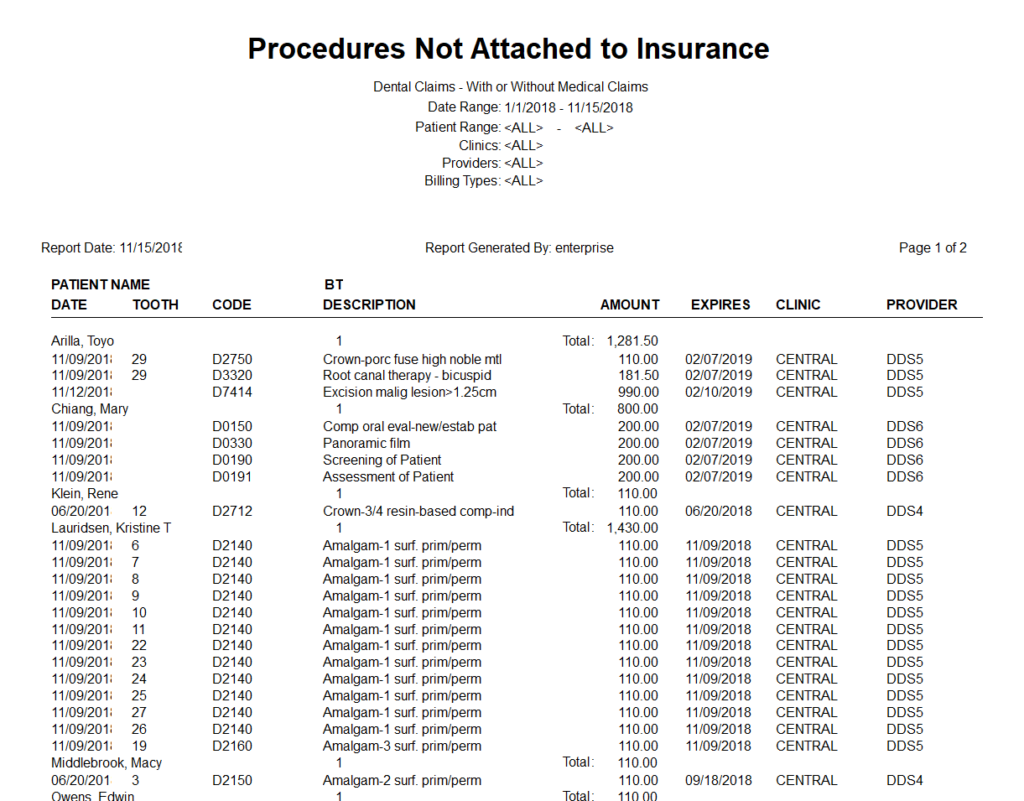
It can be easy to overlook procedures and miss them when submitting insurance claims. This often happens when a procedure was completed at an appointment but wasn’t posted in Dentrix Enterprise right away. The Procedures Not Attached to Insurance Claims report will find these procedures, allowing you to go back and submit them to insurance. To find procedures that haven’t been billed to insurance:
- Run the Procedures Not Attached to Insurance Claims report. From the Office Manager, click DXOne. Select Ledger under Select Report Category and double-click Procedures Not Attached to Insurance Claims. Leave the patient and provider options set to All so that Dentrix Enterprise looks for all procedures within the date range you specify. Click OK.
- Create and send claims as needed. Look at the list of procedures and decide which ones should be sent to insurance. One by one, open the Ledger for each patient on the list and create claims for the procedures as necessary.
- Mark procedures that shouldn’t be billed to insurance in the future. If there are procedures that should not be sent to insurance, mark them that way in Dentrix Enterprise to keep them from appearing on this list in the future. If it’s a one-time, patient-specific reason, open the procedure in the patient’s Ledger and check Do Not Bill to Insurance. If this procedure should never be billed to insurance, open that procedure in the Procedure Code Editor (Office Manager > Maintenance > Practice Setup > Procedure Code Setup) and check Do Not Bill to Insurance.
Click here to learn more about the Procedures Not Attached to Insurance Claims report.
Finding Claims that Haven’t Been Sent to Insurance
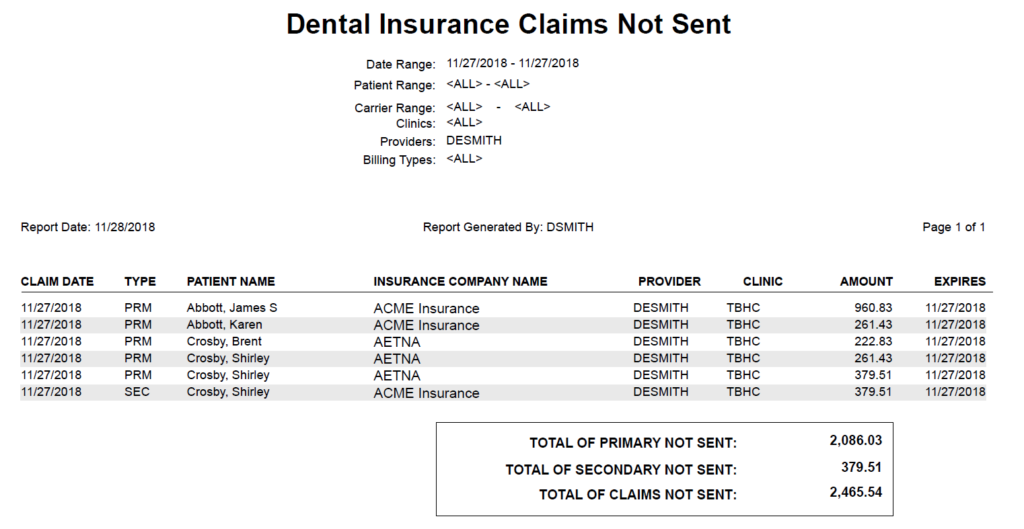
We all know that sometimes claims slip through the cracks and don’t get submitted, and running the Insurance Claims to Process report is the easiest way to catch them. This report will identify all insurance claims that have been created in the Ledger but not sent to the Batch Processor, or printed, or sent electronically through eClaims. (Note: the report will not show you claims that have been deleted.) To find claims that haven’t been sent to insurance:
- Run the Insurance Claims to Process report. From the Office Manager, click DXOne. Select Ledger under Select Report category and double-click Insurance Claims to Process. Leave the patient, provider, and insurance carrier options set to All so that Dentrix Enterprise looks for all claims within the date range you specify. Click OK.
- Send claims as needed. Find the claims that need to be sent, go to that patient’s Ledger, and send the claims.
Click here for more information about Dental Insurance Claims Not Sent.
Finding Outstanding Insurance Claims for Follow-Up
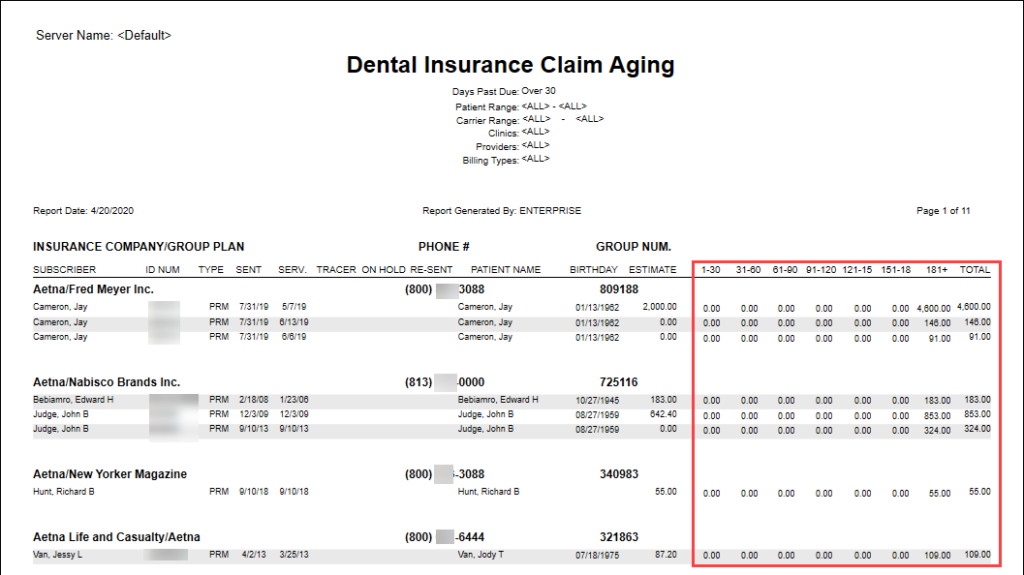
The Insurance Claim Aging Report is one of the best tools available for you to check on past due insurance claims. Running this report should be part of your regular weekly management routine.
By default, the Insurance Claims Aging report answers the “who” (the insurance carriers and patients), the “what” (the estimated costs), and the “when” (service dates and aged balances) questions you have about the claim. To follow up on outstanding insurance claims:
- Run the Insurance Aging Report. From the Office Manager, click DXOne Reports. Under Select Report Category, select Ledger and double-click Insurance Claim Aging. Set the report filters as needed, such as clinics, and click OK.
- Review the report. When the report prints, you will have a list of the individual insurance carriers and patients for which there are outstanding claims. Use this information when following up with insurance carriers.
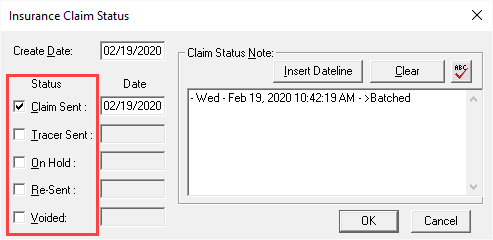
- Record status updates as needed. Record any new information you find during the follow-up by adding claim status notes to the original claim in the Ledger. View this blog post to learn about claim statuses.
Click here for more information.
Tracking the Status of Insurance Claims
If you find yourself with downtime in the office, use it wisely to locate insurance claims that haven’t been paid. Running the Insurance Aging Report is a great place to start. For more information, click here.
Creating Clinical Note Templates
Clinical note templates can save you a lot of time and can help you keep more accurate and detailed notes. Set up clinical note templates to help you document the procedures you complete regularly in your practice, like prophies, periodic exams, fillings, root canals, and crowns.
Clinical note templates can include both the standard phrases you use to document these procedures as well as specific information like tooth number, surface, or treatment plan. To create a clinical note template:
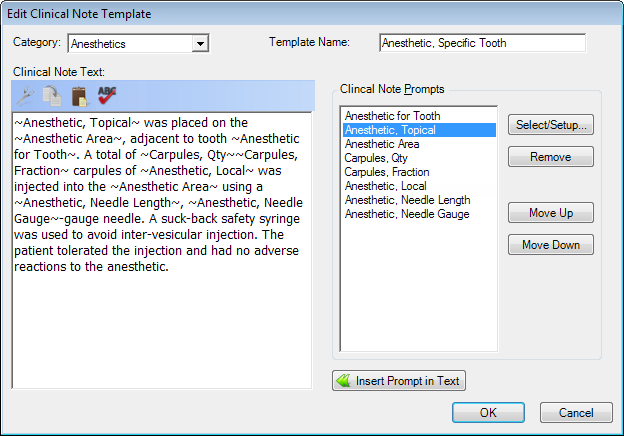
- Specify the template name and category. In the Patient Chart, click the Clinical Notes button and then click the Template Setup button. Then click New Template. Select the category for this template (or create a new category as necessary), and then enter the template name.
- Enter template text and prompts. Type the text that you want to appear in the note. To add procedure-specific information like tooth number or surface, put your cursor at the place in the text where that info should appear and, under Clinical Note Prompts, click Select/Setup. Select the prompt you want to use and click Insert Prompt in Text.
- Create new prompts. If you want to add custom information to your note like a checklist of post-op instructions given to the patient, under Clinical Note Prompts, click Select/Setup. Click New and create your custom prompt. Then select that prompt and click Insert Prompt in Text.
- Save the template. Finish adding text and prompts to your note template and then click OK.
Click here for more information about creating clinical note templates.
Cleaning Up Unused Clinical Note Templates and Categories
The easier it is to find the clinical note templates you need, the faster you can make your notes. Meet with your clinical team and discuss which clinical notes they want to keep, then look at the list of clinical note templates and delete any templates you aren’t using. Recategorize the note templates in a way that makes sense to you and delete the categories you don’t need. To clean up unused templates and categories:
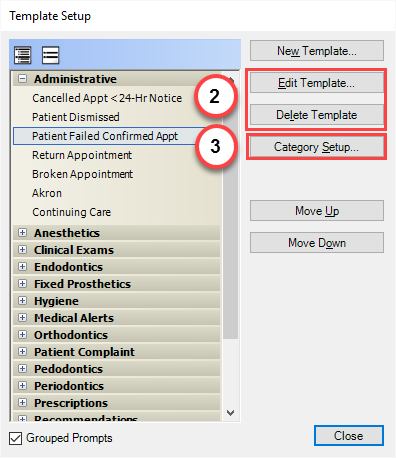
- View the list of categories and templates. In the Patient Chart, open Clinical Notes and click the Template Setup button.
- Evaluate templates category by category. Expand each category one at a time and look at each template in the category. Select each template and click Edit Template to view the template. If you do not need the template anymore, select the template and click Delete Template.
- Reorganize Categories. Click Category Setup and rearrange, add, and delete categories as necessary.
Click Here for more information about managing clinical note templates and categories.
Removing Outdated Patient Alerts
The key to effectively using patient alerts is setting them up so they only appear when they are relevant and necessary. Having outdated patient alerts pop up in Dentrix Enterprise wastes time each time they have to be cleared in order to complete a task. Having downtime in the office is a perfect chance to clean up your patient alerts so that only those that are truly relevant remain attached to applicable patients.
Generate the Patient Notes report to find patients with current patient alerts. From the Office Manager, select Reports > Lists > Patient Notes Report. Under Note Types, select Patient Alert Notes and set a date range for the alerts you want to find. Then click OK. The Patient Notes report will be sent to the Batch Processor where it can be previewed.
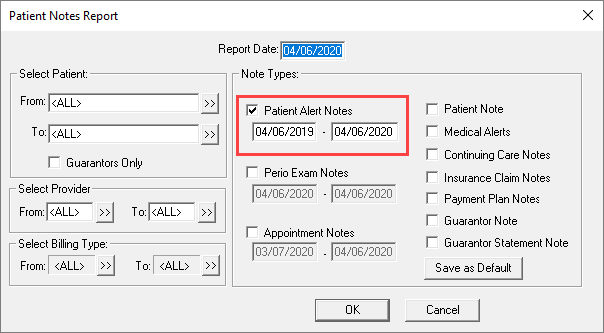
Review patient alerts. From the Patient Notes report you can view a patient’s alerts, the date they were assigned, and any notes attached to the alert. Use this information to determine if the note is still valid.
Edit or remove alerts. From the Family File, select the patient whose alert you want to remove or edit. Click the Patient Alerts button. Select an alert from the list and then click Delete to remove the alert, or Edit to make changes to the alert as needed.
Click here for more information about deleting patient alerts.
Attaching or Deleting Unfiled Documents in the Document Center
Unless you stay on top of things, the Unfiled Documents window within the Document Center can quickly become unmanageable. You should make it a priority to go through your Unfiled Documents and attach them to their relevant sources or delete them so they aren’t taking up space.
Work through the items to attach them to sources. To attach or delete Unfiled Documents:
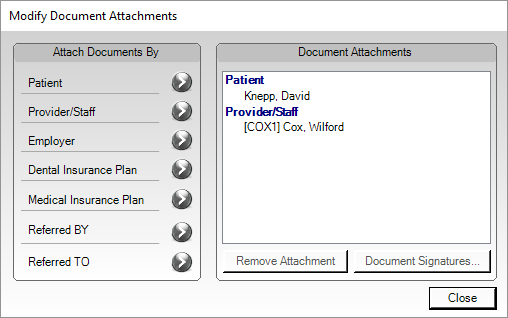
- Attach files to sources. Select a document from Unfiled Documents window. You can see a preview of the document to determine which source(s) to attach it to. Then click the Document Information button. Select a Document Type and enter a Description for the item. Then click the Modify Attachments button. Under Attach Documents By, click the search arrow next to a source, select the source, and click OK. Repeat to attach the document to multiple sources, if applicable. Then click Close, and OK. The selected item is removed from Unfiled Documents and will be attached to the source(s) you selected.
- Delete items from Unfiled Documents. At times there may be documents that you are unsure of where to attach them. Maybe they are unlabeled X-rays or images, or duplicate documents to ones you have already attached to sources. To delete an item from Unfiled Documents, select the item in the list, and then click the Delete icon. Confirm that you want to delete the item, and click OK.
Click here for more information.
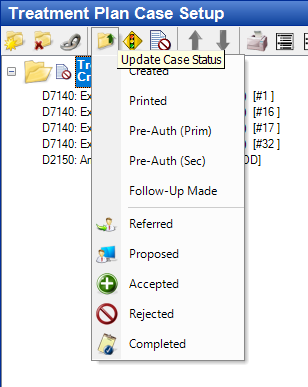
Updating Treatment Case Statuses
In order for your treatment plan reports to be as accurate as possible, you should take the time to look for expired treatment plans you have created or proposed for patients. If the cases are not likely to be completed, a good practice is to change the status of those cases to Rejected so they no longer appear on reports. Change a case status to Proposed for treatment you still want to follow up on.
- Generate a report of treatment plan cases. In the Treatment Planner, click Print > Practice Treatment Case Report. Select the Procedure Code Date Range and Case Fee Expiration Date Range you want to include on the report. Set the case status(es) to include on the report and other report options as needed. Select Print Preview to see the list of treatment plans/patients that match your results, or print the report as needed.
- Update the case status for cases unlikely to be completed. From the list you generated, open the Treatment Planner for each patient and view their case in the Treatment Plan Case Setup window. Find the treatment case you want to update the status for, and click it to select it. Then click Update Status, and select Rejected.
- Update the case status for cases that need follow-up. If there are treatment cases that may still need follow-up, click Update Status and select Proposed. The case is updated and will have a current date so you know the treatment is still valid, and you need to follow up with the patient when you are able to see patients again.
- Add notes explaining the reason for updating the status. Whenever you change a treatment case status, enter a comment detailing the reason for the status update, and click OK.
Click here for additional information
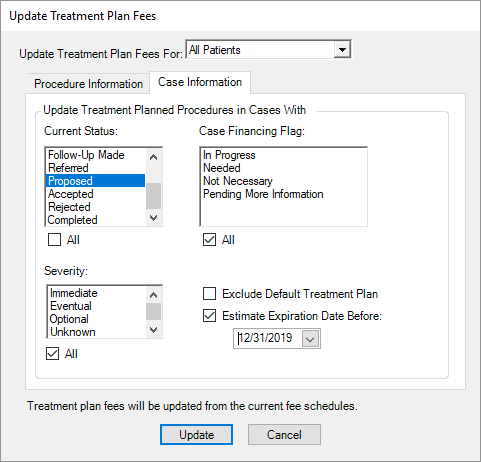
Updating Treatment Plan Fees
To maintain the integrity of treatment plan estimates, Dentrix Enterprise doesn’t automatically update treatment plan fees when you update your practice fees. You can manually update treatment plan fees if your fee schedules have changed, and those changes will apply to treatment cases that have passed their expiration date.
- Update treatment plan fees. From the Edit menu in the Treatment Planner, click Update Treatment Plan Fees. From the drop-down list, select whether to update the fees for the current patient or all patients. Under the Procedure Information tab, select the procedures, dates, providers, and/or billing types you want to update the fees for. Under the Case Information tab, select Estimate Expiration Date Before and set the date. All treatment plans created before this date will have fees updated. Click Update. Dentrix Enterprise updates the treatment plan fees according to the options you specified.
Click here for additional information.
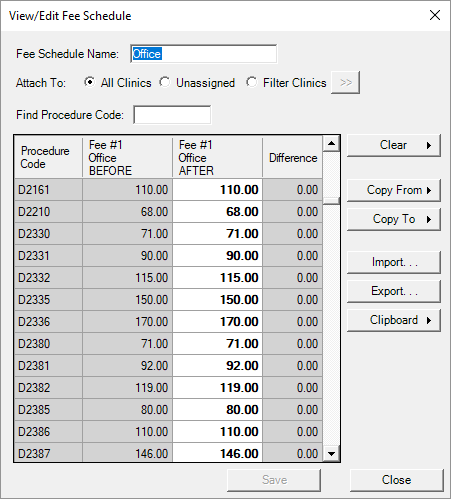
Updating Fee Schedules
Market forces are constantly changing, causing pricing for supplies, rent, and labor to change also. Consequently, your office must, from time to time, adjust the fees that you charge your patients.
Dentrix Enterprise offers a convenient way to manage your fees through the Fee Schedule Maintenance tool.
- Open the tool. In the Office Manager, click Maintenance > Practice Setup > Fee Schedule Maintenance.
- Save a copy of the fees. Before you start making changes, it is a good idea to save a copy of the current fees. Select one or more fee schedules (hold the CTRL key on your keyboard while you click additional fees), and click Export. Save the fees to a file. This file will allow you to reference the previous fees later (or even import them back in if you want to revert to your changes).
- Edit the Fees. Select a fee schedule and choose View/Edit. You can manually edit the price charged for each procedure code by selecting a code and then typing the new price. If you have the fees saved in a spreadsheet file, choose Import, and then load the file that contains your new fees. When finished, click Save.
Click here for more information about editing fee schedules.
Inactivating Providers and Staff Members
You may have staff in your Dentrix Enterprise system who have not been with your practice for years, and yet they still show up when you are selecting a provider or staff for an appointment. In order to keep your records current, you can set them to an inactive status. Doing so will keep reports cleaner, and also hide them when assigning appointments. Also, if the person is coming back, you can always re-activate them in Dentrix Enterprise.
- Determine if there are providers or staff no longer working for you. Besides getting information from your Human Resources department, you can run the Production Summary report to determine if a provider or staff is still active in Dentrix Enterprise, but is no longer working for you. To run this report, click DXOne Reports in the Office Manager. Select the Analysis Report Category and double-click on Production Summary. Select the appropriate date range, and select the option of Provider under Group By, then click OK. The report will list all providers and staff along with each person’s production.
- Inactivating a provider or staff. From the Office Manager, select Maintenance > Practice Setup > Enterprise Setup. Select the clinic that the inactive person is assigned to. Click the Clinic Resource Setup button. In the Clinic Resource Setup window, select the person and click Inactivate.
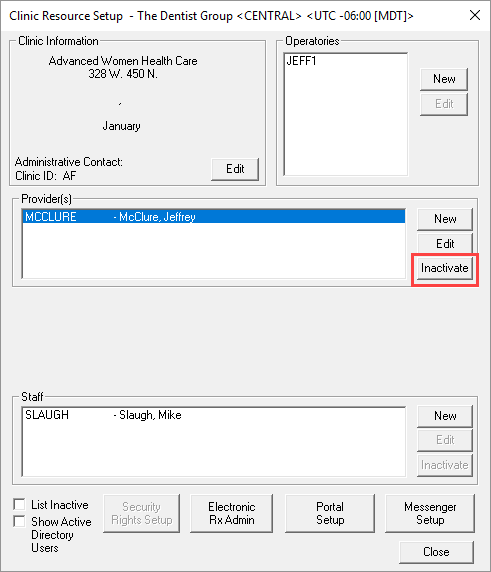
For more information on inactivating providers, click here. For staff members, click here.
Setting Up Perfect Day Scheduling
A balanced schedule consists of a mixture of procedures that have high production value (such as crowns, bridges, and endodontics) and low production value (such as composites, extractions, and preventive maintenance procedures).
The Perfect Day Scheduling feature makes it easy for you to create a balanced schedule by setting up “time blocks” to reserve space for specific procedures in your Appointment Book.
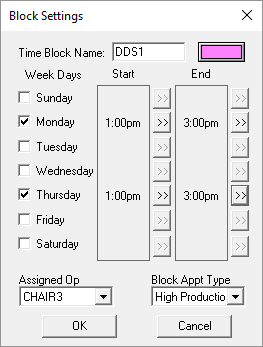
Set up time blocks for providers. In the Appointment Book, click Setup > Provider Setup. Select a provider, and then click Setup. Under Set Time Blocks, click Add. Give the time block a name, assign it a color, select which days the time block should be active, and the associated hours. If needed, set an assigned operatory and select an appointment type for the block, and then click OK.
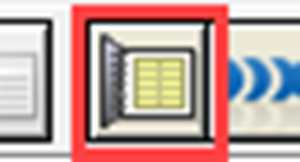
Enable Perfect Day Scheduling. Once you have assigned time blocks to providers, you can turn on Perfect Day Scheduling the Appointment Book so you have a visual reminder of what types of appointments you can schedule during the day. Click the first button from the left in the last group on the toolbar in the Appointment Book to toggle this feature on or off.
When turned on, colored blocks appear in the schedule to indicate the types of appointments those blocks are reserved for, which is a great reminder for those working to keep your schedule full.
Click here to view a previous blog entry on Perfect Day Scheduling. Click here for more information from Dentrix Enterprise Help.


