As you begin to schedule patients for appointments following a temporary shutdown, you may want to consider setting up custom time blocks in the Appointment Book. By setting up custom time blocks and only scheduling specific appointment types within those blocks, your scheduling staff can easily keep blocks of time reserved on the schedule for patients who are elderly, immune-compromised, or otherwise considered at risk or for high production procedures.
You can customize the new time blocks in any of the following ways to suit your needs:
- To reserve specific time frames, such as the first few hours your clinic is open.
- To reserve specific days, such as Tuesday and Thursday.
- To reserve specific operatories.
How To
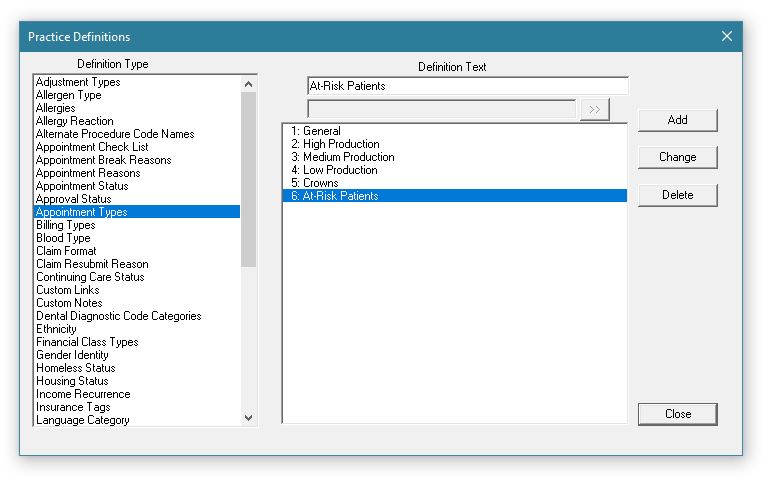
Let’s say you want to set up a time block for at-risk patients. First create an appointment type which you can then assign to patient appointments.
- In the Office Manager, click Maintenance > Practice Setup > Definitions.
- Select Appointment Types in the Definition Type drop-down list.
- Enter a description for the appointment type, such as At-Risk Patients, in the Definition Text field, and click Add.
- Click Close.
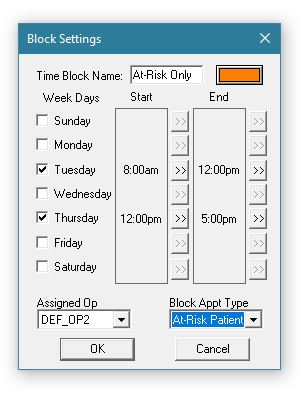
Then, create a time block in the schedule for the providers you want assigned to those at-risk patient appointments.
- In the Appointment Book, click Setup > Provider Setup.
- Select a provider, and click Setup.
- Under Set Time Blocks, click Add. Enter a Time Block Name, such as At-Risk Only, and select a color for the block.
- Select the applicable days of the week, and enter Start and End times for the block.
- Select an Assigned Op. From the Block Appt Type drop-down list, select the At-Risk Only type you created.
- Click OK.
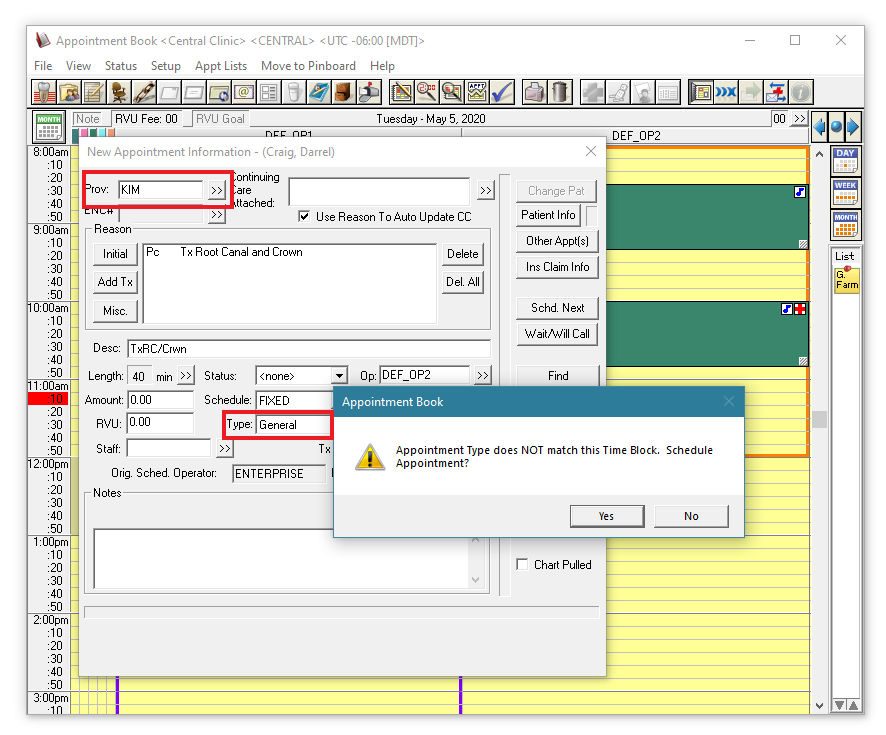
Finally, as you create new appointments (or move or edit existing appointments), be sure to open the Appointment Information dialog box and change the appointment Type to the one you created.
Important: Make sure that Perfect Day Scheduling is enabled on all workstations in your clinic. You can toggle this feature on and off by clicking the Perfect Day Scheduling button ![]() , which is located at the far-right end of the toolbar in the Appointment Book. If the feature is enabled, the button icon shows colored squares
, which is located at the far-right end of the toolbar in the Appointment Book. If the feature is enabled, the button icon shows colored squares ![]() .
.
Once enabled, the time blocks you have created will appear on the schedule as a visual reminder for those using the Appointment Book. When scheduling an appointment in a defined block of time, Dentrix Enterprise will check both the provider and the appointment type to verify that both are allowed for that time block.
By creating and using time blocks, you can designate providers, days, and appointment times for specific groups of patients who may need extra precautions.
ADDITIONAL INFORMATION
- For more information on using Perfect Day Scheduling, see the How to Schedule a Perfect Day blog post.
- For information on finding an open time slot that matches specific criteria, see the Find new appointment time Help topic.
- For information on assigning appointment types, see the Customizing appointment types Help topic.
- For information on locating the first available time block for the type of appointment you want to schedule, see the Finding an available time block Help topic.


