
To keep a practice profitable, it’s important to review your fee schedule from time to time and make sure you collect enough to cover your expenses. One of the easiest and most effective ways is to update your fees automatically to ensure that they are in line with the current market.
When you use the Automatic Fee Schedule Changes utility, you can change an entire fee schedule or a range of procedures at once rather than changing one fee at a time. For example, if you want to increase all your continuing care fee amounts, you can increase your office fees for diagnostic and preventive procedures by 3% across the board.
How To
To update fees for a range of procedures:
- From the Office Manager, select Maintenance > Practice Setup > Fee Schedule Maintenance.
- Select the fee schedule that you want to update, and then click Auto Changes.
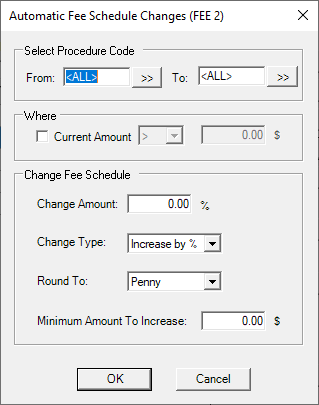
- Under Select Procedure Code, set the range of procedures that you want to include.
- Under Where, you can specify pricing criteria that a procedure code must meet for it to be changed. For example, you can specify that only procedure codes where the current amount (charge) is less than (<) a certain amount.
- Under Change Fee Schedule, do the following:
- In the Change Amount field, enter the amount to change the fee schedule by.
- In the Change Type drop-down list, select whether you want to increase or decrease by either a percentage or dollar amount. Your choice here will apply the Change Amount as a percentage or a dollar amount.
- In the Round To drop-down list, select the monetary unit to round the fee schedule amount to.
- In the Minimum Amount To Increase field, enter the minimum amount by which you want to change all the fees in the fee schedule. For example, if you enter $.50 in this field, all fees will be updated by at least $.50.
Note: This option is only available when increasing or decreasing by a percentage.
- Click OK.
- Review the summary of the fee schedule changes, and then click Save.
Additional Information
- For additional information, see the Auto fee schedule changes topic in the Dentrix Enterprise Help.


