Have you thought about protecting your practice from security breaches? Of course you have! Most organizations have systems in place to protect patient PHI (Protected Health Information) from outside security threats. But access to secure information goes beyond protecting your patients’ information from a security breach. Setting up proper security rights for each of your team members serves many distinct functions. It’s important that you set up each team member with a secure password to access the system and that you assign them proper security rights according to their role.
When used properly, Dentrix Enterprise passwords not only protect patient information, but they can protect your practice by reducing errors and limiting the number of staff who are given permission to perform certain tasks. For example, you can limit who can alter employee hours or access patient payment information.
Assigning Roles and Passwords
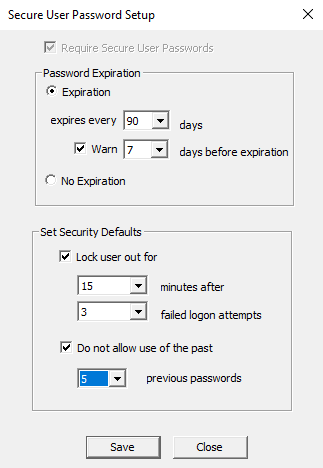
One of the main reasons why it is important to assign security rights by job classification is because it helps reduce errors. Whether your office is new to using passwords or has been logging in for a long time, you may want to adjust the individual security settings to better suit your organization’s policies. Also, consider making passwords expire every 60 or 90 days.
To access user password setup, in the Office Manager, from the Maintenance menu, point to Practice Setup > Security Setup, and then click Secure User Password Setup….
Setting Up Rights for Individuals
Assigning user rights can be a bit time consuming, but it’s important to help protect sensitive patient data and track user access. It also helps to keep each staff member aligned to their particular job descriptions so employees don’t fall into workflow gaps.
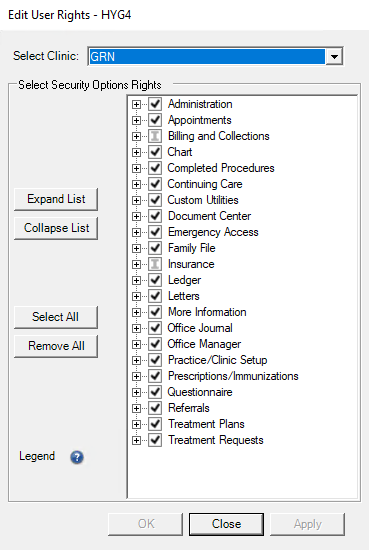
Assigning rights to individual users takes careful consideration of the staff member’s particular role in the office. You don’t want to assign too many rights to a staff member who does not need access, for example, to billing or other financial modules in the software. Keep in mind that some user rights are directly related to others, but it is still a best practice to only assign rights to individuals who are trained and designated to perform those functions.
To access security rights, in the Office Manager, from the Maintenance menu, point to Practice Setup > Security Setup, and then click Security Rights Setup….
Copying Rights from One User to Another
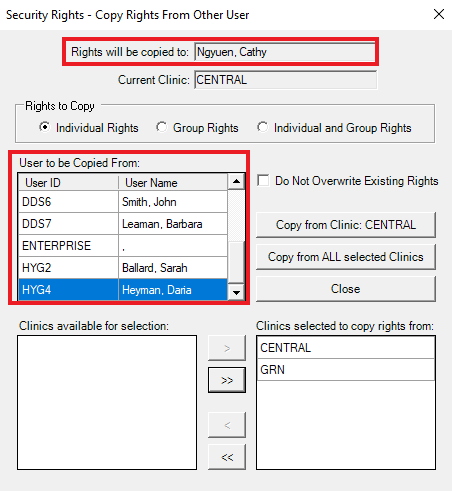
If you have already set up one user with rights related to their role, and you want to duplicate those rights to another user, select the second user (the one without rights), and click Copy Rights From Other User. Then, select the first user when prompted to do so. All of the first team member’s selected rights are copied over to the second user.
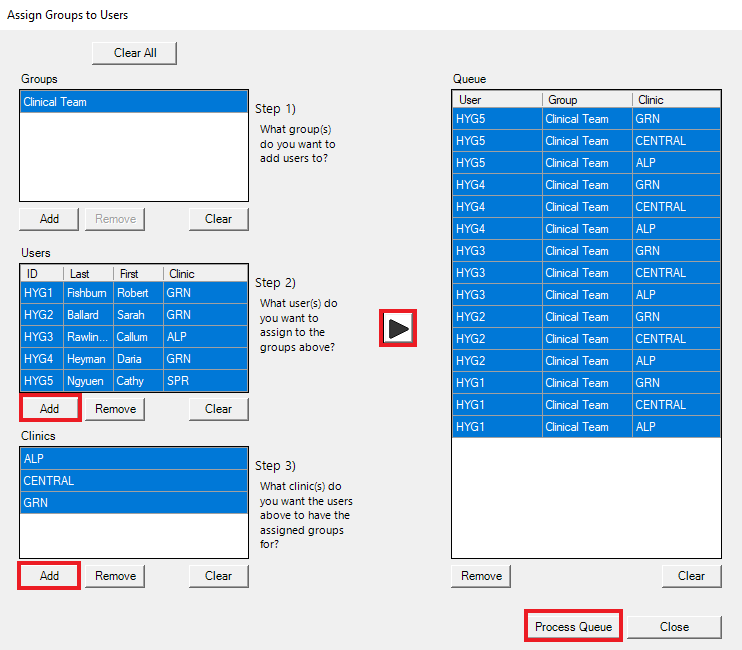
Setting Up Rights for Groups
If you have several staff members who are assigned the same role, you can create a user group. Creating groups saves you time by allowing you to manage and modify the security rights for all the users in a group. Add a new group in the Security Rights Setup window, and give it a name such as “Clinical Team” or “Front Office Staff.” Select the checkboxes of the rights you would like to assign to the users in the group.
After you have set up the rights assigned to the group, you can add users and clinics to that group. Click the arrow button to add them to the Queue, and then click Process Queue.
Additional Information
- For more information on assigning users security rights, see the Assigning security rights and Assigning users to groups Help topics.
- For more information on copying rights from one staff member to another, see the Copying security rights Help topic.
- For more information on giving a staff member specific rights, see the Assigning user verification to tasks Help topic.


