
Did you know that you can rearrange the toolbar buttons in certain modules of Dentrix Enterprise? With a few easy steps, you can customize the order of the toolbar buttons into a configuration that works for you. Keep in mind though, that doing this only affects the workstation where the customization occurred—not any other workstations.
You can customize Dentrix Enterprise toolbars in one of two ways, depending on the module you are working in.
Customizing the Patient Chart, Appointment Book, Family File, Ledger, or Office Manager Toolbars
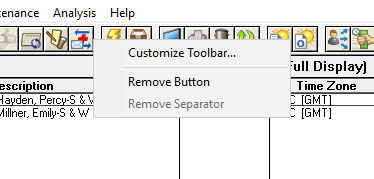
- Right-click anywhere on the toolbar ribbon, and then select Customize Toolbar. This example is from the Office Manager toolbar:
The Customize Toolbar dialog box opens.
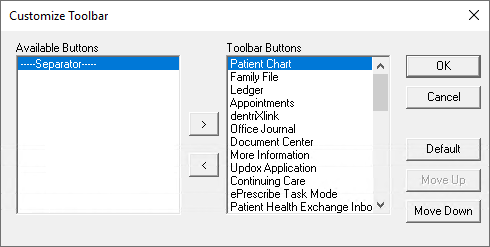
- The Customize Toolbar dialog box is divided into two lists: Available Buttons (those not currently in use on the toolbar) and Toolbar Buttons (those currently in use). Do any of the following to customize the toolbar:
- To remove a button from the toolbar, select an item in the Toolbar Buttons list, and then click the Move Left button (<) to move it to the Available Buttons list.
- To add a button to the toolbar, select an item in the Available Buttons list, and then click the Move Right button (>) to move it to the Toolbar Buttons list.
- To rearrange the order in which a button appears on the toolbar, select an item in the Toolbar Buttons list, and then click the Move Up or Move Down button until the selected item is in the position you want. Repeat this process for other buttons as needed.
- To return the buttons to the module’s default settings, click Default.
- Use Separators to set up groups of buttons:
- To add a Separator, select the —Separator— option in the Available Buttons list, move it to the Toolbar Buttons list, and then position it as needed.
- To move a Separator in the Toolbar Buttons list, select it, and position it as needed.
- Click OK to save your changes.
Note: The Toolbar Buttons list, from top to bottom, represents how the button arrangement will appear on the actual module toolbar from left to right.
Additional Information
- When you move a button from the Available Buttons list to the Toolbar Buttons list, the button is automatically inserted at the bottom of the list. Move the button within the list as needed.
- For more information about customizing the toolbars for the Patient Chart, Appointment Book, Family File, Ledger, and Office Manager view Customizing the classic toolbars in the Dentrix Enterprise Help.
- Customizing a toolbar works differently in the Document Center and Treatment Planner modules. For more information about customizing toolbars in these modules, view Creating a custom toolbar in the Dentrix Enterprise Help.


