When your practice re-opens and you begin scheduling patients again, you should keep in mind the time it will take to clean each operatory before the next patient appointment. You will need to allow time for surfaces to be wiped down and disinfected, time for staff to change gloves and masks, and so forth.
There are three ways you can set up the Appointment Book to account for this extra time needed to disinfect an operatory between appointments.
Option 1: Creating an Event Following each Appointment
It only takes a few extra seconds to create an event after you add an appointment to the schedule, but doing so can help to ensure that your staff has enough time to create a clean, safe, disinfected room for both patients and providers.
- Right-click the time slot immediately following an appointment, and select Schedule Event.
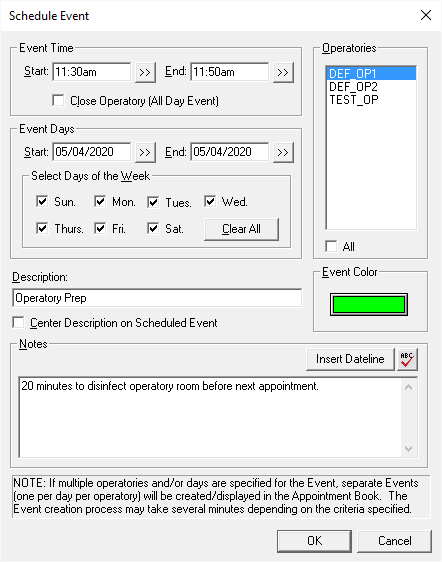
- Under Event Time, set the Start and End time based on how long it will take you to prepare an operatory for a new patient.
- Under Event Days, the Start and End date should match with the appointment you created. If it does, you don’t need to worry about items that may be selected under Select Days of the Week.
- Under Operatories, make sure the operatory that corresponds to the appointment is selected.
- Enter a Description for the event, such as Operatory Prep.
- Select an Event Color that will stand out against the color of the appointment the event will be seen next to.
- Add Notes as needed to explain the event. These notes appear when you position your mouse pointer over the event in the Appointment Book.
- Click OK to create the event and add it to the Appointment Book.
Option 2: Adjusting the Appointment’s Time Length and Pattern
Another option is to add extra time to each appointment so that the time to clean the operatory is built into the appointment itself. You can accomplish this by updating the Appointment Time Pattern and adding empty chair time for the amount of time it takes to clean the operatory.
- In the Appointment Book, double-click a patient’s appointment.
- Click the Appt Length search button to open the Appointment Time Pattern dialog box.
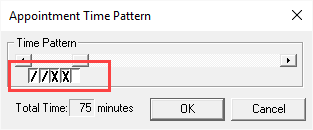
- Use the left and right arrows to increase or decrease the appointment time.
- Set the last block(s) to empty chair time, depending on how long it will take to clean the operatory.
Note: Each box under Time Pattern can contain one of the following:
- A slash (/) to represent assistant time
- An X to represent provider time
- An empty block to represent empty chair time
- Click OK to save your changes.
When viewing an appointment in the Appointment Book, the left side of the appointment indicates the time pattern for each time unit of the appointment.
Option 3: Adjust the Default Time Pattern for Each Procedure
The third option is to edit the default time pattern for a procedure code in the Procedure Code Editor. By using this option, you make the changes once to each procedure code. When a procedure is posted to the Appointment Book, the extra time for cleaning is already built into the procedure. Just remember that eventually things will return to normal, and you will need to change the default time pattern back for every procedure when it does.
- In the Office Manager, click Maintenance > Practice Setup > Procedure Code Setup.
- Select a procedure code category and the individual procedure you want to edit, and then click Edit.
- In the Procedure Code Editor dialog box, under Procedure Time, click the search button.
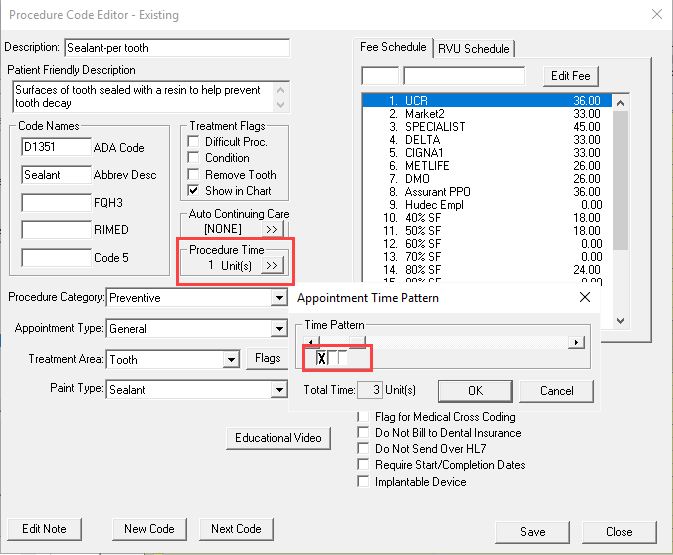
- In the Appointment Time Pattern dialog box, set the total number of units required for the procedure.
- Select each unit of time and then click the appropriate button to assign that unit as Provider, Assistant, or Chair/Clear Time.
- When finished, click OK to return to the Procedure Code Editor, and then click Save.
When making any adjustments to help you respond to current changes with patient appointments, just remember that, when things return to normal, you will need to adjust the schedule, default time patterns, and procedure codes back to their original settings.
Additional Information
- To learn more about this feature, view the Scheduling events Help topic.
- To learn more about this feature, view the Scheduling appointments for existing patients Help topic.
- To learn more about this feature, view the Adding and edting ADA-CDT dental codes Help topic.


