The Dentrix Enterprise Continuing Care module gives you the ability to see patient continuing care information in a variety of ways. A key component, not only of viewing this information but being able to use it as an interactive list to contact patients, is creating views which show you specific groups of patients.
The Continuing Care Views Setup dialog box allows you to create customized lists of patients based on filtering criteria. By default, Dentrix Enterprise comes with the following continuing care views:
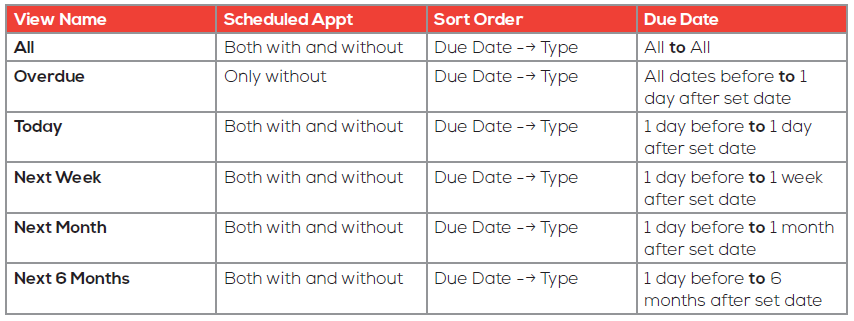
Note: The defaults may have been changed since the installation of Dentrix Enterprise, and as a result, the list of views in your office may not match what is shown here.
In addition to the default continuing care views, you can add and edit continuing care views to create views that meet your specific needs, such as a list of patients overdue for their periodontal maintenance.
To add a continuing care view:
- From the Appointment Book, click the Continuing Care button.
- Select the Views menu, and click Setup.
- Click New to add a continuing care view. (Or, select an existing continuing care view, and then click Edit to edit the view.)
- In the View Name field, enter a name for the view.
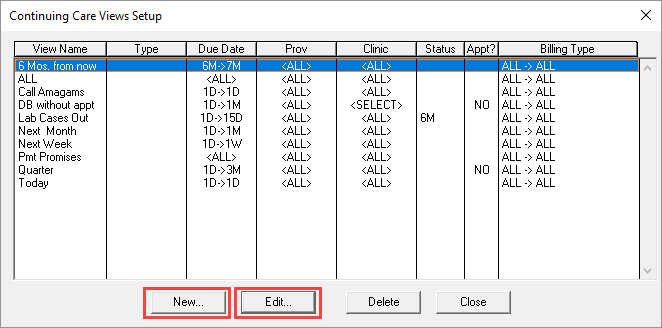
- Set up the desired filters:
- Type – Select a type from the drop-down list, or select <ALL> to include all types. Select With CC to view patients who have an assigned due date for the selected continuing care due type. Select Without CC to view patients who have not been assigned the selected type.
- Status – Select a status from the drop-down list, or select <ALL> to include all statuses.
- Sched Appt? – Select an option from the drop-down list. To view patients due for continuing care, both with and without a scheduled appointment, leave <ALL> selected. To view only patients with an attached appointment, select Only WITH. To view only patients without an attached appointment, select Only WITHOUT.
- Due Date – View patients by a filtered due date. To generate a list for a specific range, select Use Due Date Range, and enter the date range you want to see. To generate a list for a generic time span (such as one month), select Use Due Date Span, and set the span in the Before and After fields.
- Billing Type – Enter a range of billing types to include.
- Prior Treatment Date Span – Filter the list by the patient’s continuing care prior treatment date. Enter a date span in relation to today’s (or the set) date. The date you set here looks at the date the patient was last seen for the continuing care reason.
- Last Visit Date Span – Filter the list by a last visit date span. Enter a date span in relation to today’s (or the set) date. The date you set here looks at the date the patient was last seen for any reason.
- Run – Enter a range of clinics or providers to include.
NOTE: Today’s date is only visible if <ALL> is selected for both From and To as the date span.
- The Sort Order field allows you to define how the list organizes its information. To change the sort order, highlight the option you want to re-order and use the Page Up or Page Down key on your keyboard to move the highlighted option up or down in the list.

- Click OK to save the view and generate a list of matching results.
Once you have created a view, use the information it displays to contact patients about their overdue continuing care and schedule appointments.
To generate a continuing care list:
- From the Appointment Book, click the Continuing Care button.
- Select Views, and select the view you created. A list of patients who match the filtering criteria appears.
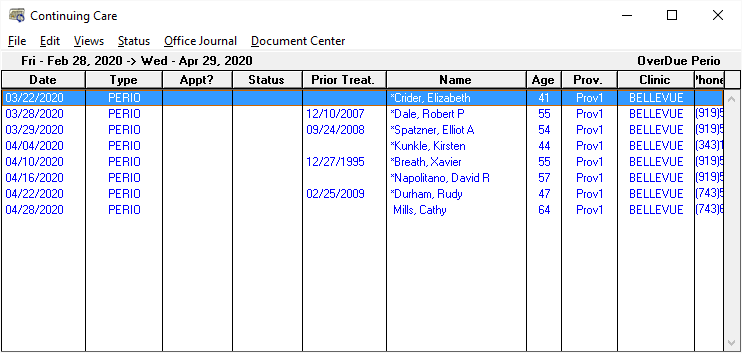
- Use the information within the list to contact a patient by phone, and double-click the patient’s name in the list to open the Appointment Information dialog box to schedule an appointment.
Additional Information
For specifics on how to add and edit Continuing Care views, see the Adding and editing Continuing Care views Help topic


